Kelly’s Combined Barefoot Running Sandal Tying

Kelly's No-Knot Huarache Tying Style

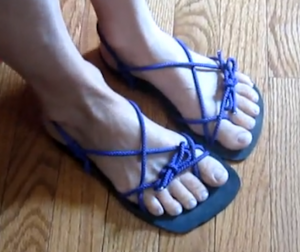
Kelly’s is a “combined” tying method.

You can move the knot to the back of the shoe, behind your heel, if you like.

First, a tying tip:


Lacing tips:


Kelly’s Combined Tying Style

This video makes a reference to our old name, Invisible Shoes and show our Classic Kit… you can do this with our FeelTrue outsoles which will be much better.

Also, you can do the same lacing style, but “rotate” it so the knot ends up behind your heel!

And since there’s exposed lace under your foot, I recommend coating that part of the lace with Shoe Goo for added protection.

4 thoughts on “Kelly’s Combined Barefoot Running Sandal Tying

  1. This is so comfortable. I love it already. Thank you for the great instructions!

    1. So, after wearing these for a month, I have some suggestions. First up, the laces will loosen over the first couple of days. I think that is because there is no core (at least in the laces I got with my kit) and so the lace flattens and gets a little longer. I’m thinking this is a new thing because the “lacing tips” video shows a white core inside the lace. Mine do not have that. I recommend tying the shoes a little bit tighter at first to allow for this relaxing of the laces. You can’t really tighten them after the fact, because the lace portion that is on the bottom will get smashed and dirty pretty quickly. My shoes are a bit too loose, but they are still ultra comfy and I love them.

      Secondly, USE THE SHOE GOO! I didn’t, just because I wanted to see how long they would last. Apparently, I walk on the outside of my feet and so the lace under the shoe that is by the pinky toe is completely hashed. I have been wearing them all day every day for just over a month and they finally have worn completely through. Remarkably, the shoe still stays in place because the hole is very small and the lace hasn’t pulled through yet. I also went crazy with the bow and ended up cutting it off after a couple of days. I like just a plain knot. Way easy and cute. It does come undone every now and then and so I think I will melt it a little together with a flame next time.

      Anyway, I when I placed my original order I ordered an extra set of laces, so I’m ready to try this again. I am going to watch the video another couple of times while I lace up my new laces, making them a little too tight at first and adding the shoe goo on the bottom for good measure.

      I can’t tell you how many compliments I get on my “cute sandals” and my posture feels so much better. I LOVE my Xeroshoes!

      1. Thanks for your ideas, Lisa.

        FWIW, we made this lace specifically so that it doesn’t stretch (you can hold one end and pull on the other and see that). What *does* happen, though, is that the loops/knots can sometimes “settle” over the first day or two.

        And, yes, for any of the tying styles that have exposed lace on the bottom, Shoe Goo is really important.

        Finally, you figured out a great “secret” about melting things to lock them in place 😉

  2. I’m getting ready to order my next set of laces. I’m so glad it is getting warmer so that I can wear my Xero shoes again! Going on Summer #3 with these soles. Love, love, love these shoes and LOVE this tying method. I have no desire to tie any other way. Going to go with grey this time….

Leave a Reply

Your email address will not be published. Required fields are marked *