latest News
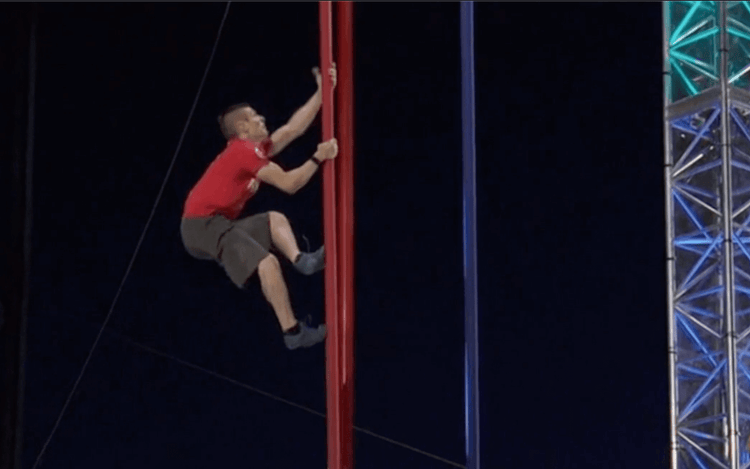
Dave Cavanagh + Xero Shoes Prio = American Ninja Warrior!
BIG CONGRATS to Dave CavanaghDave is a multiple-time "walk on" to American Ninja Warrior. He was, finally, invited to compete in the recent try-outs in Baltimore and... well... check out how he did.And check out the shoes he's wearing!Yup, those are our best-selling running/fitness shoe, the Prio. Dave is heading to Las Vegas for the finals and we're all rooting for him!
The Hidden Hamstring: Release Low Back Pain - Xero Shoes
By Matt Giordano, @theyogimatt Updated 7/26/22 The Lower Back Do you suffer from tight hamstrings?Many runners, active adventurists, and even those who sit at a desk all day experience tremendous hamstring tightness. (“Hamstring” is the term usually used for the muscle group that runs along the back of your thighs.) As a result, the pelvis might get pulled downward in a tucked (posterior tilt) position causing the low back to be chronically rounded (flexed).For most people, constantly tight hamstring muscles will result in lower back tension, discomfort or issues with your intervertebral discs – which exist between each of your vertebrae in your spine, providing cushioning for shock absorption. Preserving the natural curvature of the lower back and avoiding back pain (or nerve pain) can prove to be challenging if the hamstrings hold tension from overuse or underuse.What most people don’t understand about the body is that it is constantly trying to correct itself. When the hamstring muscles are tight and pulling the pelvis into a posterior tilt, the lower back will hold tension because those muscles, in turn, are trying to pull the pelvis back toward neutral in order to bring the proper curvature back in the lumbar spine.So most people feel the tension in the lower back and start stretching those muscles. Unfortunately, this perpetuates the issue and can even exacerbate pain. What might be the better solution is to strengthen those muscles and stretch the muscles that are the root of the tension – the hamstrings.The challenge is finding the right hamstring stretch to properly loosen the hamstrings. So what is the best approach to hamstring stretching?The “Hidden Hamstring”Something I have noticed in most athletes is that when they stretch the hamstring muscles they do all the right stretches – like a standing hamstring stretch where they bend forward over one leg, or a chair hamstring stretch where they bring their leg up on a bench, etc.However, it is rare that I would see them stretching the inner thighs as well. As a result, they are missing what is often referred to as the fourth hamstring or what I call the Hidden Hamstring: The adductor magnus.The adductor magnus squeezes the legs toward each other like the other adductors, but uniquely it also extends the thigh back behind the hip (the back leg when running or walking).Now often when we do a hamstring stretch the hamstring muscle can be tight enough that it doesn’t allow us to get into the stretch of the adductor magnus. In other words, hamstring muscle tightness holds us back from getting to the necessary depth.Rather than straining and overstretching the hamstrings to target the adductor magnus we can simply add a slightly different stretch, one that also targets the adductors (inner thighs).Let me explain how it’s done.Best Hamstring Stretches: The Magic Pose There are a couple of amazing postures in yoga that stretch the adductors and the hamstrings at the same time. One of the best ones for hamstring stretches is the “Triangle Pose.”This pose is one of the most iconic yoga postures and there’s a great reason why! It not only stretches the hamstrings, but also the inner thighs and sides of the torso. With slight variations of the shape, you can change the intensity of stretch in each area and target your tight areas, and back off your flexible ones.If you are new to the Triangle Pose or generally have tighter hamstrings and adductors I highly recommend having a yoga block, books, or a chair to put your bottom hand on so that you don’t risk straining any of the muscle groups in this posture. A slight stretch is all you need.A very similar pose is called Side Angle, and this is triangle pose but with one knee bent. With the knee bent you will reduce tension in the hamstrings and actually be able to stretch the adductor magnus a bit more easily, so I recommend starting here and then moving to Triangle Pose. If your hamstring stretches are too aggressive you risk injuring your muscles.Now for the practical part. How do you actually get into Triangle Pose and begin to loosen your tight hamstrings?How to get into Triangle Pose Start by placing your feet wide apart from each other. Turn your right foot and thigh outward until it is perpendicular to the left foot. Bend your right knee. Place your right hand on a block, book, or chair on the outside of your right thigh. (You can also place your hand and prop on the inside as well, which will change the stretch and potentially offer a more accessible experience for those with less hamstring flexibility.) You should feel a slight pulling sensation. Stay in this posture – Side Angle Pose -to target the adductor magnus for 5-8 breaths.Pro Tip: Pull your two feet toward each other to warm up the inner thighs and hamstrings. After your 5-8 breaths, your body will likely desire to straighten the front leg. If so, proceed to Triangle Pose by straightening the front leg slowly, and stopping when the stretching sensation in your hamstring is a 7 out of 10. Stay in Triangle Pose for 5-8 breaths. To come out of Triangle, re-bend the front knee, press down into your feet and rise up. Repeat this same procedure for the left side. The ResultsThe result may or may not be immediate back pain relief. Remember, hamstring tightness is only one part of the problem. (And, besides, it will take time for your tight hamstrings to improve as you add hamstring stretching to your daily routine.) You will also need to work on strengthening the muscles that extend your lumbar spine to help bring your back into its natural curve and out of the rounding position.Be sure that if you are doing “core” workouts your core routine includes just as many lower back strengtheners as front abdominal strengtheners. Your core isn’t just the front of your belly.Triangle Pose and Side Angle Pose will help you to stretch the muscles that might be tugging your tail bone down and flattening your lower back. As a result, your lower back has a chance to come back to a place of better shock absorption and away from the stacked compressive position that is so prominent in many long-distance runners.If you are used to other kinds of stretches for your tight hamstrings, like a wall hamstring stretch, try adding Side Angle and Triangle Pose hamstring stretching into your post-run/hike/climb routine while you are warm and observe the results!Until next time,Matt GiordanoMatt Giordano is an international Yoga instructor and founder of Chromatic Yoga.The content of this post does not constitute and is not intended to be a substitute for professional medical advice, diagnosis or treatment. Always seek the advice of a physician or other qualified health provider with any questions or concerns you may have about your health or a medical condition.A note from Xero ShoesI hope you enjoyed this helpful post from Matt. Correct stretching is an important part not just of avoiding hamstring tightness and finding back pain relief, but of avoiding injuries in general.I just wanted to add a note about something else that’s super important that people often overlook: form. What I mean is the way we run or even walk.Why does this matter? The way we move affects the kinds of stresses we put on our muscles, bones, ligaments, and tendons (just like how our posture can contribute to low back pain). This is true of our hamstrings along with the other muscles of our legs and feet.I mention this because people sometimes ask me, “What are the best running shoes for hamstring injury prevention or for getting over a hamstring injury?” I’m not a doctor or physical therapist, and can’t give medical advice. I can say, though, that most “typical” footwear interferes with what your body is built to do. For example, elevated heels impact posture, stiff soles and excessive support reduce foot strength, pointed toe boxes restrict natural movement, and cushioning eliminates your foot’s ability to feel the ground.If you can see that it’s probably a good thing to let your body move the way it’s made to, then you’ll want to consider a “barefoot” shoe.Our barefoot shoes are designed to do just that: allow your feet to move as they should and give your body the feedback it needs to adopt a better form. Find your pair of Xero Shoes here.You can read more about form, why it matters, and even how it relates to lower back pain here.I always want to make sure I’m clear about this: if you have a running injury, talk to a medical professional. They may recommend physical therapy or other kinds of treatment. I’m not a doctor and nothing I am saying here is intended to be medical advice or to take the place of professional guidance.
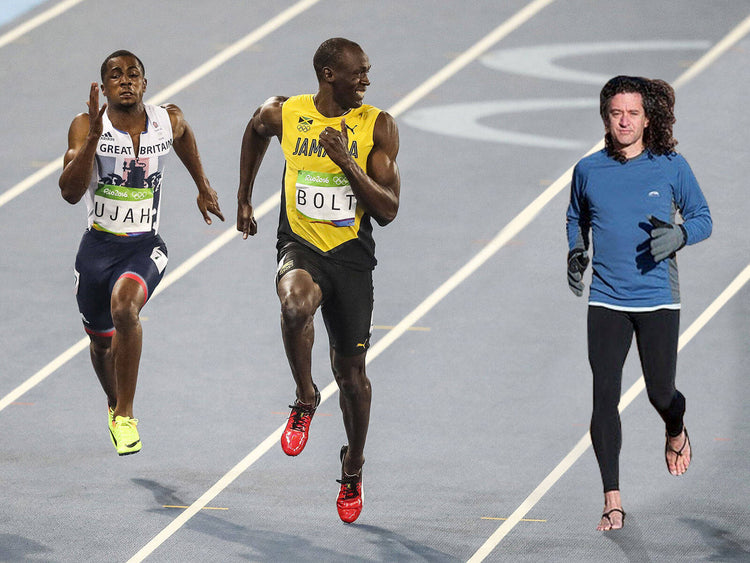
Usain Bolt beaten by 56 year old Xero Shoes CEO?!
We've seen Steven run from bears, lions, racecars, and more...but Usain Bolt?We've put this pic on Facebook, Instagram, Twitter and here, on the blog, where you can comment below. Head to one (or all) of those places and give us your best caption about Steven and the greatest sprinter of all time.One winner will be selected to receive a FREE pair of Xero Shoes of their choice. Winner will be selected April 25, 2019.

Get Xero Shoes Z-Trail at REI and get a $10 Xeroshoes.com Gift Certificate
We are THRILLED to announce that you can now buy our best-selling Z-Trail sandal at REI stores across the country and at REI.com!Plus, we have a special offer for you:Buy a pair of Z-Trail at an REI store or REI.com and you can get a $10 XeroShoes.com gift certificate!Get all the details about which stores have the Z-Trail sport sandal and how you can get your bonus -- CLICK HEREWatch Lena and Steven discover the Z-Trail at the Boulder REI
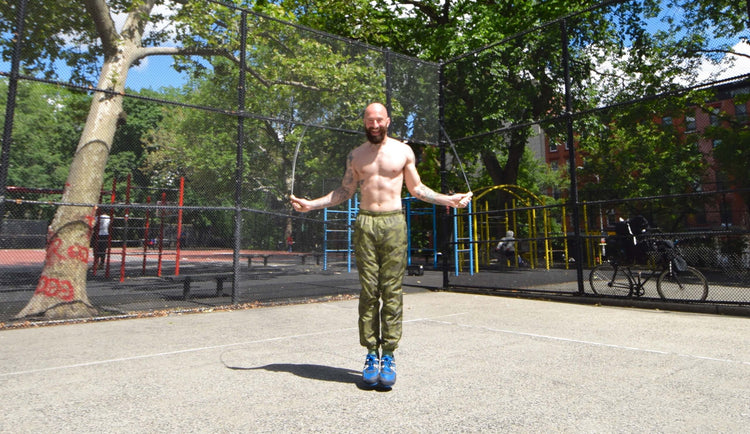
Jumping Rope for Cardio
It might be a lot of fun, but jumping rope is not just for kids. The jump rope is a fantastic device for building stamina and athleticism, plus it’s also a great method for burning fat.In fact, a jump rope is one of the best cardiovascular conditioning tools out there–way better than a treadmill or elliptical trainer. Plus you can take it with you anywhere!Jumping rope can also have a huge impact on improving your coordination and agility. You can probably expect to get winded and feel uncoordinated the first time you try jumping rope for cardio, but after a few sessions you will start to get the hang of it.Basic Jump Rope TechniquesThe first thing to learn is the standard two-foot jump. Start with the rope behind your heels, then whip in over your head and jump over it with both feet at the same time. If you are brand new to this, it might be best to just practice single jumps, resetting your rope after each rep. Eventually the aim is to transition from jump to jump as smoothly as possible.Once you get that move down, you can try alternating feet like you are jogging in place while the rope passes beneath you on each step.Crossovers and Double UndersAfter you’re comfortable with the basics, you can start to play around with crossover jumps. This entails switching the position of your hands in mid air, so your left hand winds up outside your right hip and your right hand is outside your left hip. On the next jump, you’ll then switch them back. It takes focus and coordination to get the timing right for this one, so be prepared to put in some practice before you will be able to perform them consistently. Also be prepared that you may need to jump a bit higher in order to stay in the air long enough to cross your hands back and forth between jumps.A double under refers to a jump in which the rope goes underneath the feet of the jumper twice during a single leap. In order to perform a successful double under, you’ll need to whip the rope extremely quickly and jump higher than normal to make room for the rope to pass beneath you twice before you land.Programming Your Jump Rope WorkoutIn the beginning, I suggest simply practicing the basic techniques before you worry about any specific programming. You can practice for a few minutes at the start of your workout as a warm-up, or do it at the end. You can also do it on a separate day entirely. As long as you get it in, when you do it is up to you.Once can comfortably jump continuously for at least 60 seconds, you can try doing intervals where you alternate between one minute of jumping and one minute or rest. Keeping that pace up for 20 minutes can be surprisingly tough at first! As your technique and conditioning improve, you can aim to make your jumping intervals longer and your breaks shorter. You can also increase the length of your sessions.For variety’s sake, I recommend practicing some crossovers and double unders, particularly during longer sessions. Be aware that these moves will be more tiring, however, so you may need to adjust your work-to-rest ratio to account for this. One of my favorite ways to practice crossovers and double unders is simply to pick a total number to aim for in a single session, then hit that target in as many sets as it takes, with as many breaks as needed. At first, you might aim to perform just 10 of each in a given session, as you will miss many of your early attempts and expend a lot of energy doing so. As you get more proficient, you can increase that number to 100 or more.So what are you waiting for? Grab your Xero Shoes and let’s jump around! -Al Kavaldo http://www.AlKavaldo.comThe content of this post does not constitute and is not intended to be a substitute for professional medical advice, diagnosis or treatment. Always seek the advice of a physician or other qualified health provider with any questions or concerns you may have about your health or a medical condition.
More Buzz about Vibrating (and Parkinsons)
It's happening again, I think.In the Thomas Industry, David Mantey reports on a new device designed to help Parkinson's patients "walk with greater ease."What does it do?It applies vibration your feet.A few years ago, I reported on a similar device.So...Q: What is vibration doing?A: Stimulating your nervous system, feet first.Q: Why might you need extra stimulation?A: Because you aren't letting your feet do one their primary jobs: FEELING (there's a reason you have so many nerve endings in the soles of your feet) Take a look at this screen grab from the video about the "VibeForward" device:That's over an inch of padding between you and the ground. And a sole that's stiff enough to prevent your foot from moving naturally.This is like putting your foot in a cast.Now here's the fun question:Q: What else could stimulate the nerves in your feet?A: USING THEM.Taking off your shoes so you don't have an an inch of padding between you and the ground. And then, for extra credit, walk on surfaces that, well, stimulate your feet -- grass, sidewalks, trails, gravel, river rocks... you get the idea.At the very least, put LESS between you and the ground (that's how we design Xero Shoes -- to give you feedback and ground-feel, but still have some protection).Is this exactly the same as the VibeForward? No, walking barefoot doesn't require batteries, or an app, or use "artificial intelligence."Q: Will kicking off your kicks and using your feet naturally have the same effect for Parkinson's patients who suffer from freezing gait?I don't know. But, then again, the data isn't in about the VibeForward yet either.The Michael J. Fox Foundation gave the University of Delaware $440,000 to study the VibeForward.Here's my big question:Q: How can we get the Michael J. Fox Foundation to fund a study on natural movement -- something that's available to everyone NOW?Got an answer?The content of this post does not constitute and is not intended to be a substitute for professional medical advice, diagnosis or treatment. Always seek the advice of a physician or other qualified health provider with any questions or concerns you may have about your health or a medical condition.

Hiking for Health
Want to improve your health AND have fun? Take a hike! Hiking has significant health benefits. Here are just 5: Hiking on rugged trail surfaces is a natural way to engage your core muscles, Burn calories -- Hiking on uneven terrain increases the amount of energy used by your body by 28 percent compared to walking on flat ground, Get strong -- Hiking helps to strengthen often neglected muscles in your hips, knees, ankles, and feet to improve balance and stability, Hiking is good for your brain: research shows that time spent in natural environments engages all five senses and calms brain activity, Instant meditation -- just being out in mother nature reduces your mind’s tendency to get stuck on negative, self-focused thought patterns – resulting in a happier, healthier you! So, go on a hike! Your body and mind will thank you.Your new favorite shoes for hiking and trail running:The content of this post does not constitute and is not intended to be a substitute for professional medical advice, diagnosis or treatment. Always seek the advice of a physician or other qualified health provider with any questions or concerns you may have about your health or a medical condition.
Comfy, Cushioned Shoes Can CAUSE Injuries
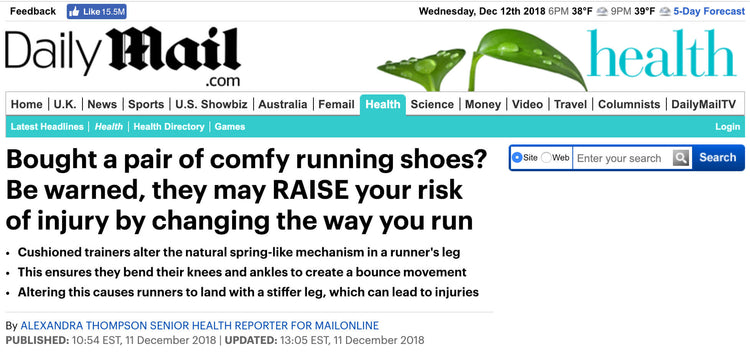
This just in from the "Tell me something I didn't know" department. ;-)The UK's Daily Mail reports, "Comfy trainers RAISE the risk of injury." You would think that a major publication telling readers why "maximalist shoes" are bad for you would make me happy, but read on and you'll see why my glee is tempered with frustration. (Click on the image, above, to see the article or find it on the Daily Mail site: https://www.dailymail.co.uk/health/article-6483593/Comfy-trainers-RAISE-risk-injury.html) In short the article comments on research from Dr. Juha-Pekka Kulmala, and says: [Between] 37 and 56 per cent of joggers experience injuries every year worldwide. These injuries are thought to largely occur due to the vertical force that is created when a runner's foot hits the ground. To reduce this, many trainer manufacturers have added cushioning to their shoes' soles, however, there is no evidence that this actually prevents injuries. ...Runners' feet hit the ground harder when they were wearing cushioned trainers. A video analysis showed the runners bent their knees and ankles less when they wore the cushioned shoes, which caused their bodies to slow down quicker and placed extra stress on their legs. Now, this shouldn't be news to people familiar with Xero Shoes, or this site, or the myriad studies done showing the problems with cushioned footwear and the benefits of truly minimalist shoes (not shoes sold with "minimalist" in the name, but without the same design principles.So, on the one hand, I'm thrilled to see the truth in print.On the other hand, this article does the same thing that others of this type have done, namely: Makes it seem like the bad control "the Brooks Ghost 6" is good for you, since it's better than the Hoka Conquest. Paints the picture that there's actually a debate, or a value for what we affectionately call "foot coffins" (any shoe that doesn't let your foot bend, flex, move, feel). In the article, Dr. Kade Paterson, a podiatrist at the University of Melbourne, says: 'As a sports podiatrist, I’ve seen patients who’ve reported improvements with maximalist running shoes and others who’ve got injured in them so there probably isn’t a one-size-fits-all approach.' Dr. Paterson added the results do not suggest runners should ditch cushioned shoes entirely and said 'like many health-related things, we should be somewhere in the middle'. The only way you can come to that conclusion is if you do something else that most articles of this type do:Don't reference the research on true minimalist footwear, like that done by Dr. Irene Davis or Sarah Ridge or Isabel Sacco and others. This research paints a compelling picture for why natural movement, well, is better than shoving your foot into something that's not foot-shaped, not flexible, has elevated heels with flared soles, and too much padding. You know, like the Brooks Ghost 6.Even more absurd is the warning given at the end of the article:Dr. Kulmala has previously warned about the trend of barefoot running, which he only recommends if you land at the front of your feet. Most people land on their heels, which creates a larger force and therefore needs more cushioning, he added.ARGH!Talk about missing the point. Or putting the cart before the horse. Or confusing cause and effect. Or some better metaphor or analogy than I can think of now.Harvard's Dr. Daniel Lieberman and others have shown that putting padding under your heel is what encourages heel striking to begin with, and that running barefoot tends to naturally shift you to a forefoot landing, which reduces those stressful forces on your bones and joints because you use your muscles, ligaments and tendons as the natural springs and shock absorbers they're meant to be.So, put it all together...Look, I'm glad that the "myth of maximalism" is being dismantled, but I hope that the "truth of natural movement" gets more attention in the process.The content of this post does not constitute and is not intended to be a substitute for professional medical advice, diagnosis or treatment. Always seek the advice of a physician or other qualified health provider with any questions or concerns you may have about your health or a medical condition.
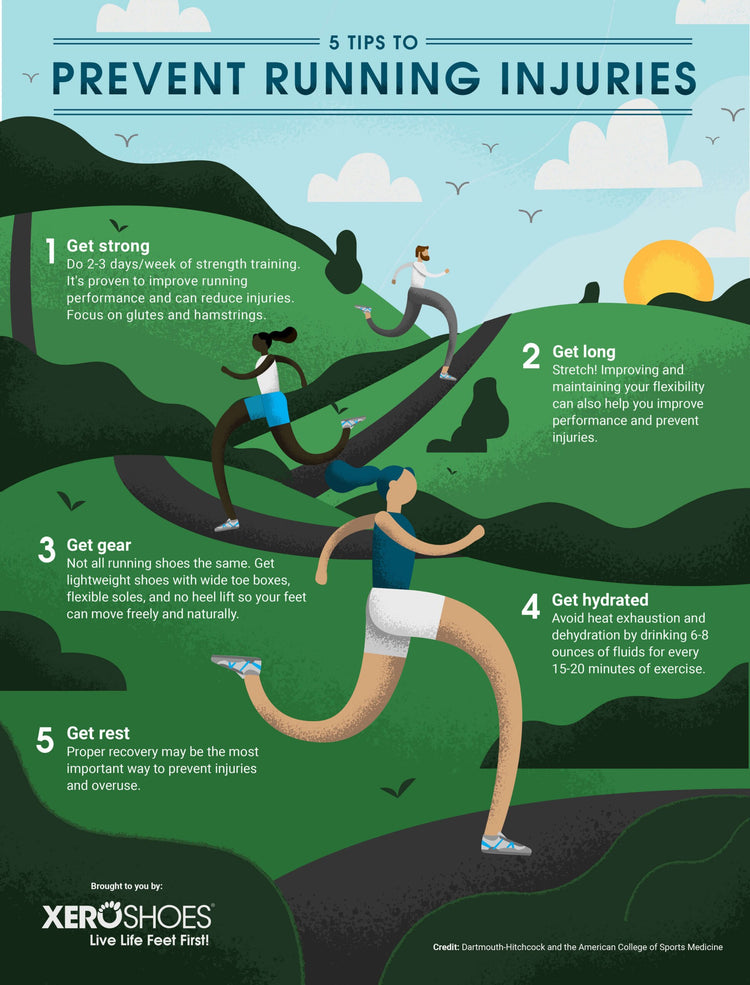
5 Tips to Help Prevent Running Injuries
While it's not possible to never get injured when running (or living, for that matter), here are 5 tips to help keep injuries at bay. What do you think? Have any other tips? Leave them in the comments, below.Think other people could use these tips? Share this page.Want it for yourself? The content of this post does not constitute and is not intended to be a substitute for professional medical advice, diagnosis or treatment. Always seek the advice of a physician or other qualified health provider with any questions or concerns you may have about your health or a medical condition.
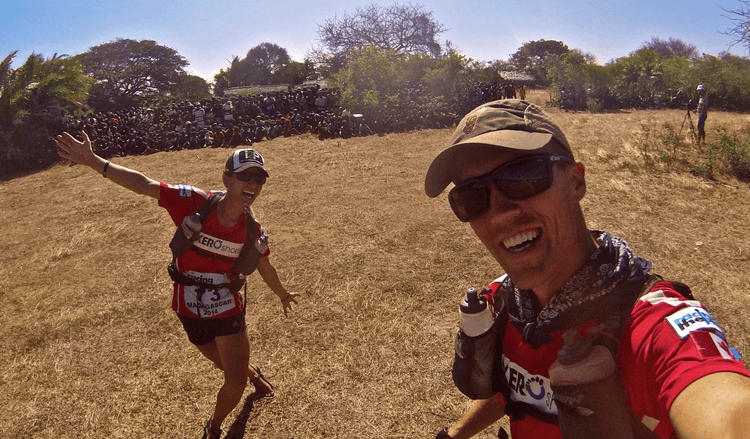
The Evolution of Xero Shoes in an Ultra Marathon Running Couple
Xero Shoes is a company that has come a long way. Looking back, we have come quite a long way as runners and adventurers. As we've grown, we've realized what a long way we've come WITH our Xero Shoes. We ordered our first pair of Xero Shoes in 2013 after reading the book Born to Run and wanting to get more involved with running minimalist. At that time we had both caught the running bug, and were running in our super smelly vibrate 5 fingers!The first pair of Xero Shoes we ever wore were the 4mm DIY sandals and we wanted to get trained up in them for our first ultramarathon together. Our biggest hurdle? It was winter in Edmonton, Alberta, Canada, and our race was only 3 months away. We had a few chilly runs in the cold with numb toes, to say the least. We managed to get enough training in, as we finished the Born to Run 100km race that we had planned! Later that year, we also ran a 50 mile ultra in Fernie, BC (Rocky Mountain style running!), a 100 miler in South Dakota (pretty flat, but HOT), and a 100km race in Costa Rica (where we legitimately ran with Tarahumara runners from Mexico!!). All of these were done in either the 4mm or the 6mm DIY sandals. So if any of you are still wondering “can you run in these?” Yes, you can run for miles and miles!Ultimately, we ended up being the first runners to complete one of 4 Deserts’ 7-day, 150 mile stage races wearing sandals. A year or two later we were living in Chile and Xero Shoes had just released their Z-Trek sandals. This was perfectly timed as we had two ultras planned that year in Chile, yet both had a lot of mountain running on rugged terrain, so we were super excited to wear the Z-Trek sandals at it gave you a bit more stability when on gnarly or muddy surfaces. Very soon after the Z-Trek was released, they launched the Z-trail, and we realized this one was our unicorn. The Z-style rig with a tiny bit more width of sole made it a primo piece of footwear for long trail ultras. We ran a 100 mile race down the entire length of the Florida Keys and with how hot and humid it was, it was super nice to have that tiny bit thicker sole for the 27 hours of pounding. We weren’t quite sure they would ever make the jump, but in 2016 Xero Shoes released their first actual shoe. While the first styles weren’t really built for running, we were excited to see where it lead. Low and behold, it shortly led to the release of our single most favorite shoe (ever): the Prio. With an absolutely incredible fit, a slick look, and the comfort, it's by far the best shoe we've ever put on our feet. I wore my first Prio for a wet and muddy 50km ultra near Seattle, with only two training runs to test them out. Not a single blister and they performed like a dream! It’s interesting how when you buy a shoe that just fits…you don’t have to “break them in." The latest big win for us was when Xero Shoes took the Prio and beefed it up a bit to make the TerraFlex, an athletic shoe with a bit gnarlier treads and a tougher upper. It’s pretty much everything we could have asked for in a perfect Prio… but made more for tough trail running. We’ve run races in the Canadian Rockies with these, over in a Morocco, and all over the US where we can find good trails! There have been a number of styles that Xero Shoes has launched that we love as well, but these were the keystone pieces of footwear that really progressed with us along our ultrarunning journey and we look forward to seeing what they’ll come up with next! :)–Mel & Jon The content of this post does not constitute and is not intended to be a substitute for professional medical advice, diagnosis or treatment. Always seek the advice of a physician or other qualified health provider with any questions or concerns you may have about your health or a medical condition.
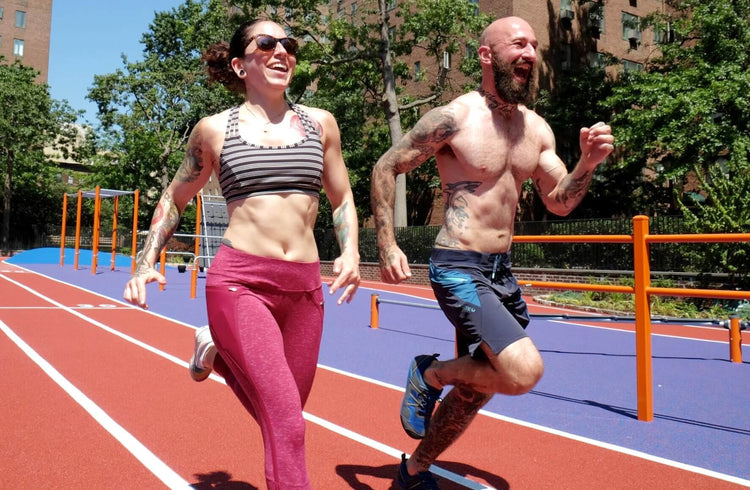
An Easy Running Program for Beginners
When I tell people that I love distance running, I often get reprimanded. “You’re going to blow out your knees,” people warn me. I don’t know if they genuinely think they are going to save me from the perils of ACL surgery or if people just like to get on a soapbox, but it’s getting old.Distance running is not inherently bad. When injuries occur, it is usually due to improper training and/or poor technique. If you take good care of your body and you know how to safely progress, there shouldn’t be an issue. Too many people get it in their head that they want to run a marathon, but they can barely even run a mile. If you don’t build up to longer distances gradually, you are setting yourself up for overuse injuries. In general, the rule is to increase your total mileage by no more than ten percent each week. In the beginning, I suggest you start out by alternating between short intervals of running and walking. You don’t need to follow a strict protocol, just run at a steady pace for as long as you can (which might be anywhere from 30 seconds to several minutes). Then when you need to, take a break and walk until you catch your breath. Repeat this process for 20 or 30 minutes, then stretch out and call it a day. Al and Grace Kavadlo running up a storm!In time, your walk breaks will get shorter until you can eventually run for 30 minutes or longer without a break. Once you can do that, you can start going for longer distances, or try alternating between jogging and sprinting for your interval training.If you want to do a Marathon or Half-Marathon, be smart about it – you’re going to need to run at a substantially slower pace and gradually build up your mileage. This type of running is usually referred to as long slow distance or “LSD” running. Anyone who’d want to run a Marathon must be tripping, right?LSD running is slow enough that you can maintain a conversation while running, so feel free to invite a workout partner. Take your time on LSD runs, it should feel almost like how walking feels to a non-runner.Going from being a non-runner to completing a marathon can be a journey of years. There is no rush. Just enjoy the process and take things one step at a time.–Al Kavadlo The content of this post does not constitute and is not intended to be a substitute for professional medical advice, diagnosis or treatment. Always seek the advice of a physician or other qualified health provider with any questions or concerns you may have about your health or a medical condition.
Tips to Transition to Minimalist Running
There is an overwhelming amount of information available in the world today on how to best make the switch from regular padded or “supportive” footwear to minimalist footwear. The Xero Shoes team themselves have accumulated an amazing amount of great information and other tips on making the transition, but as a couple of ultra-marathon runners who train and race (and actually spend most of our days every day) in minimalist footwear, we would like to share some of the things that helped us early on when we made the switch. Won’t be going into too much detail around the science and research side of it all, as we aren’t doctors or researchers ourselves, but lean on more of our purely experiential learnings from heavy training and recovery practices that we have. Transition Time This shouldn’t come as much of a surprise, as it’s talked about quite a bit surrounding the minimalist running topic. But we still want to reiterate it because it’s such a foundational part of transitioning to minimalist and really will be a key factor in your longevity in the practice. If you do just one thing from this entire article, do take your time during the transition, as no amount of stretching, rolling, supplements, or any other medical treatment will be able to PREVENT issues or injuries, the way building a solid foundation will. If you take the time to let the body adapt and strengthen the muscles, tendons and other tissues, you’ll save yourself a lot of setbacks down the road! Let us make one this very clear though, it’s not at all about the actual time (in days, weeks, months, etc.) it takes to transition, but more about the method of how you transition. The actual time to transition will depend on so many factors, so just focus on paying attention to your body and how it feels. When you feel like you’re ready to increase speeds or add volume then do so. Some people will adapt faster, some people are coming from different backgrounds, so just pay attention to your own journey and know that this is a long-term change and you will reap the benefits far into the future. One last tip we’ll include on this topic. If your goal is to transition to running in minimalist footwear, keep in mind that running is only a small portion of every day. Think about ways you can also spend time in minimalist footwear at work, around the house, while running errands. Between the Genesis sandals and the Hana/Cassie shoes, there’s footwear for just about every style, so these are great ways to build that muscular stamina you’ll need in your lower legs. Form This is the second layer that is super important to also PREVENT injuries from popping up during this transition. Watch videos, find a coach, read articles, basically consume as much information you can about minimalist running so that way you’ll know what you need to work on, and what things aren’t worth worrying about. For example, during the early days of the minimalist movement, it was all about landing on your forefoot. As more research was done, it wasn’t so much about which part of the foot lands first, but more about where your foot lands in relation to your center of gravity (good article on this). There are also some coaches who hammer on technique drills to get your movement patterns dialed in. Whereas there are other coaches who feel that it’s pretty tough to change 20, 30 or 40 years of muscle memory, so it’s more valuable to focus on proper muscle development to work with your pre-wires movement patterns. Bottom line, there’s a lot of conflicting information out there, and there’s no one perfect answer, or method or training, or form to use. But don’t just wing it by slapping on some huarache sandals and going for a 40km (25 mile) run! Bottom of foot rolling Two of the issues we BOTH noticed came up for us while we were ramping up our mileage in minimalist footwear, was 1) a mild cramping on the bottom of the foot, and 2) a more intense pulling pain on the top of the foot. After lots of troubleshooting, it seemed like the root cause of both of these was tight calf muscles. By switching to a more mid/forefoot landing, our calves had to work harder. This cause the calves to tighten up. The calf muscles are connected to insertions on the bottom of the feet by the facia, which explained why we were feeling the tightness down below. And because the calves were tight, they were pulling on the bottom of the foot, which required the muscles that attach to the top of your foot to hang on a little tighter to keep the foot stable. It was literally like a tug-o-war match! The single most effective remedy to both of these was surprisingly enough rolling a ball under our feet (while standing). We found a lacrosse ball was the perfect size and density to give good pressure without making us scream. However, a golf ball is also a decent option that you might have around your house. There’s no textbook technique, but two quick pointers: i) Move slowly ii) do long rolls from the front to the back of your foot. Magnesium (both internally and externally) After some longer runs on the weekends or other hard training sessions, you’re bound to feel some tight muscles. When a lot of your muscles are tightening up, it’s sometimes good to take a broader approach and address and help all of your muscles. Magnesium is something that many of us are actually deficient in, and it’s one nutrient that actually aids in our muscle function of letting go and relaxing. Magnesium supplements can be taken orally to give your body (including your aching leg muscles) some calming help. You can also find different muscle rubs that are applied to the skin and allow magnesium absorption that way, so this can be done specifically on the calves or other leg muscles that might be feeling extra tight. Kinesiology tape This one we want to set a precaution for. In a similar fashion to the way we think about painkillers, and that is that they simply mask an issue and risk pushing your body to a severe point of damage. Kinesiology tape does help two relieve certain types of pain. They also don’t have any of the side effects that painkiller medication have. And it does have some great benefits for improved blood flow and other neurological functions. But the overall “masking” issue is still there. Applying kinesiology tape to a muscle or body part in order to avoid pain or help you push through it, risks causing a lot of damage to the muscle. Now that we’ve said this, we are both advocates of kinesiology tape when a situation calls for it. Best to talk with a physical therapist (and best to have them apply it too!) to see if it can benefit you. We’ve used it during races when a muscle tightens up on us and there simply isn’t enough time to sit down and roll it out or wait for magnesium to kick in. Or if we have a race coming up some leg pain pops up the day before. Sure we’ll roll it out and do what we can, but to make sure we’re good to go for that starting line, sometimes we’ll consider applying some kinesiology tape. Hopefully, one or more of these tips can help you in your transition to minimalist footwear. The journey is absolutely worth it, and your body will be much better built up for physical activity for a long time to come! –Mel & Jon The content of this post does not constitute and is not intended to be a substitute for professional medical advice, diagnosis or treatment. Always seek the advice of a physician or other qualified health provider with any questions or concerns you may have about your health or a medical condition.C