Xero Basic

barefoot sandal tying -- Xero Basic

This is the tying style we use for our Custom-Made Xero Shoes.

Once you get the tension just right, you slip ’em on and off in a second. People use this tying style for everything from walking to running marathons.

First, a few tying tips and notes:


Tying the Lace knot:

This is the knot we most commonly use, especially with our 100% polyester laces.


The “Lace Bead”:

This is the smallest “knot” you can make for your Xero Shoes.


Tying a Figure-8 knot:

If you have our original laces with the nylon core, you’ll want to use this knot.


Lacing tips:


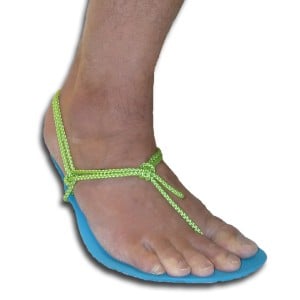
The basic running sandal tying pattern


Xero Basic Tying Style


Same thing, reversed image

Barefoot Sandal TyingClick here to download step-by-step instructions for the Xero Basic.


22 thoughts on “Xero Basic

  1. Great Vids. Just got my shoes the other day.

  2. The hard part at the end of the shoestring is called an aglet.

  3. Bobby pins are named after the Bobbed haircut that they are used for that became popular in the 1920’s. These Xero shoes look neat. I’ll have to get a pair. I’m still debating 4mm vs. 6mm.

  4. Wow. Had originally tied using the minimalist style, just retied a new set of laces in the Xero Basic style… that is so much more comfortable and feels much more secure as well. Wish I’d tried this for the first 100km I ran in them!

  5. Underneath just the bottom = in between the two for those who speak normal English.

    1. Actually, JJ… if I had said “in between the two”, that could be interpreted as “over the bottom and under the top” (which I’ve seen people do).

      What would have been correct — had I the ability to be 100% perfectly clear when making hours of unscripted video — is the combo of the two of us:

      “…underneath the bottom then in between the 2 laces and over the top…”

    2. JJ: The video is quite clear in demonstrating the technique for tying. Even if the audio was jibberish, a “normal” person could see how to tie the laces, whether or not they speak ‘normal English”…whatever that is. Take a pill, JJ, you’ll feel better.
      Sorry to vent on your site Steven. I think your videos are quite informative and I like my Huaraches very much. It was fun using the DIY kit to make them my own! I wish you and your creations much success (especially as a former Boulderite myself)!

  6. I like the feel of this tying style, but every time I walk on grass (as opposed to sidewalk/asphalt) the back straps around my heels fall down and I have to keep bending over to tighten them. Am I the only one with this weird problem? Otherwise they are great!

    1. I’ve never heard anyone reporting that before… you may want to change the angle of the heel strap. Look at Sonja’s tying style to see how — basically, instead of making one loop around the ankle hole, you make 2-4 of them.

  7. I just got my shoes tied & ready to go. I love them! They are so comfortable. Saves the hassle of making sure I have shoes to go into stores:) I’m on crutches right now & I’m not worried about them slipping around or anything. Thank you Xero Shoes.

    1. Oh, that is BRILLIANT!

  8. My heals fall out on the inside of the shoe, what do i need ot adjust?

    1. That’s almost always solved by tightening the heel strap (a picture, especially taken from behind and ground level, would help me say anything more specific).

  9. To get the tension right, I suggest tying them with your feet in the shoes and then walking around with them for a bit. The walking will loosen your shoes up to just the right tension.

  10. This doesn’t explain where to punch the hole

    1. Correct. This video is about tying. The info about the rest of the process of making Xero Shoes is at http://www.xeroshoes.com/make

  11. You’ll have to send pics of your newly invented tying style!

    I put the stickers on my big toe nail 😉

  12. With the exception of banging my head on a shelf whilst walking around the living room looking at them, not too much blood, it all went well. Time to take them for a real test walk.

  13. Where is the video that tells me what to do with excess string?

    1. It mentions in this video that you can trim it off… or look at the ideas nearer the bottom of http://www.xeroshoes.com/tying for some decorative options.

  14. Practicing tying with my old, makeshift flip flop pair and finally got them so they didn’t slip off the heel. The basic running style pattern is much easier to adjust than the one I learned in an older video. Of course, now that I have the strap tied correctly, the side where I trimmed off the rubber is too narrow and my littler toes hang off. And the cheesy, thin flip flop soles may be thin, for flip flops, but they’re still something like 10 or 11 mm thick. One thing they DO have is bottom countersunk holes so, while the holes are too big, they’re exactly the size of some thick little washers I had, which keeps the toe knot from pulling through. They’re better than shoes for walking but I’m not sure I’d want to run in them. Being so thick. Anyway, NOW I will know how to lace them properly when my real ones arrive! Can’t wait for those extra sensitive, super thin soles!

    I have been running up and down the stairs, jumping on the kid’s old rebounder and running in place, checking out my new, pain-free feet and huarachi tying method. After 40 some years of not being able to do any of that, it hadn’t even occurred to me to try until I wrote about it in another comment. I loved running so much as a kid that I’ve always had dreams in which I would just take off and “run with abandon”, for no apparent reason…so if you pass a goofy-grinnin’, pudgy, poky old broad in a pair of your shoes at a race, one of these days, it might be me!!

Leave a Reply

Your email address will not be published. Required fields are marked *